- Home
- Leiter: Prof. Dr. Rudolf Kruse
- Mitarbeiter
- Lehre
- Forschung
- Publikations- datenbank
- Kontakt/Anreise
News-Archiv

[ Welcome | Application | Repository | Documentation ]
This is the preliminary documentation of the build principles of Infominer. They will be accumulated here until a proper substructuring suggests itself.
Repository Layout
The top-level directory (/trunk) contains four subfolders with the following contents.
/data
Contains some test data for analysis as well as example models./dev
Root directory for the development./redist
Target directory for the ready-to-use distribution./work
Other stuff like flyers, logo files, and other assets.
Development Directory Structure (/dev)
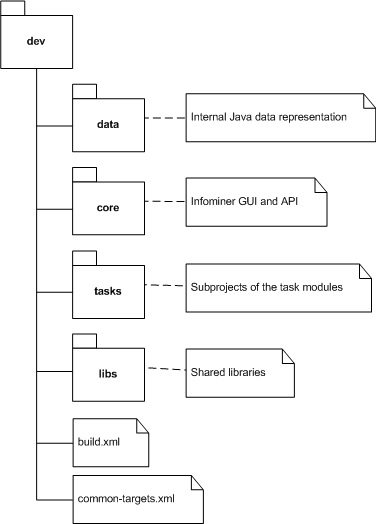
This directory contains four subfolders as indicated on the left
image as well as the main two build files: build.xml and
common-targets.xml.
Folders data and core are proper project directories
(the layout of which is described later on) whereas tasks
serves as a toplevel directory for the several module projects.
libs is not a project but contains all those libraries
that are required by at least two projects. (libraries needed for only a single
project are contained in the project's own library directory.)
Project Structure
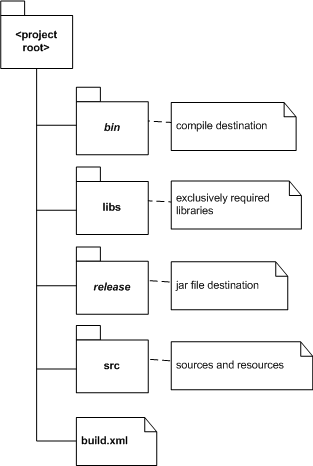
The image depicts a typical project directory (as for data, core and the tasks).
The folders in italics are not inside the repository but are created upon build via
build.xml.
Each project has to provide its own build file but may be dependent on other
projects. Currently data is stand-alone, core depends on data and every
task depends on both core and data. Inter-task dependencies are not yet necessary.
How to write a custom task?
In the following we will demonstrate the creation of a new task from scratch. Since a HelloWorldTask wouldn't quite fit our needs, we use the MultiNetViewerTask as an example.
It is used to display an aggregated view of a multitude of graphs.
First of all, create a new class called MultiNetViewerTask (by convention, all task class names end on Task) and let it derive from edu.unimd.cs.fuzzy.infominer.core.task.AbstractTask. Tell your IDE to generate method stubs for all abstract methods as there are: registerSlots and run. In addition to that augment the class definition with the two constructors from the base class. The naked class frame should now look as follows:
public class MultiNetViewerTask extends AbstractTask
{

	public MultiNetViewerTask(TaskManager mgrOwner)
	{
		super(mgrOwner);
	}

	public MultiNetViewerTask(TaskManager mgrOwner, Element elmTask, Logger log)
	{
		super(mgrOwner, elmTask, log);
	}

	@Override
	protected void registerSlots()
	{
	}

	public void run()
	{
	}
}
Let's set up the task further. Add a static logger instance variable as well as an internationalization helper that automatically finds the appropriate terms for the slot names.
    private static final Logger s_log = Logger.getLogger(Module.LOG_TASKS_INES);
    private static final I18n s_i18n = new I18n(ResRoot.class);
We assume here, that Module is a valid module descriptor class of the current module and that LOG_TASKS_INES contains the logger name. Further the class ResRoot resides in a resource package, which has to contains the files i18n_XY.properties were XY represents the respective locale suffix like de or en.
Now it's time for our first (and in this case only) slot, the connection slot that serves as out only input.
private ConnectionSlot m_slotInNets = null;
To make this slot available it has to be registered (and created, of course) which is done via -- you will guess it -- registerSlots. Add the following code.
        m_image = Utils.createImage(ResRoot.class, "task-netview-large.gif");

        registerInputSlot(
        	m_slotInNets = new ConnectionSlot(
        		this, "InNets", s_i18n,
        		Vector.class ));
As you can see, we abuse the method by setting an appropriate icon for the task as well. m_image is a member of AbstractTask. The creation of the input slot needs a reference to the owning task (this), a string name ("InNets") to address the slot, the internationalization helper (s_i18n) and the type of the object that the slot shall contain (in our case a Vector).
Now that we have finished the slot registration, we have to make sure, it is invoked. So, add the respective call to both constructors. In the same instant, call initSlotsFromXml from the constructor that has the Element argument. The first constructor is called when the user drags a task into the graph area. The second one is invoked when a model is loaded from file. The class should now look as follows:
public class MultiNetViewerTask extends AbstractTask
{
    private static final Logger s_log = Logger.getLogger(Module.LOG_TASKS_INES);
    private static final I18n s_i18n = new I18n(ResRoot.class);

    private ConnectionSlot m_slotInNets = null;

	public MultiNetViewerTask(TaskManager mgrOwner)
	{
		super(mgrOwner);

		registerSlots();
	}

	public MultiNetViewerTask(TaskManager mgrOwner, Element elmTask)
	{
		super(mgrOwner, elmTask, s_log);

		registerSlots();
		initSlotsFromXml(elmTask, s_log);
	}

	@Override
	protected void registerSlots()
	{
		m_image = Utils.createImage(ResRoot.class, "task-netview-large.gif");

		registerInputSlot(
        	m_slotInNets = new ConnectionSlot(
        		this, "InNets", s_i18n,
        		Vector.class ));
	}

	public void run()
	{
	}
}
This is already sufficient for the task to be plugged into Infominer. If you want to give it a try, make sure that the module descriptor class has something similar to the following line in it's constructor:
defineTask("MultiNet Viewer", "Data Mining/Graphical Models", MultiNetViewerTask.class);
You should then be able to create a MultiNetViewerTask object.
Let us now turn to the interesting part: the lifecycle of the task which is implemented by the run method.
Whenever a task is started, the run method is invoked and should set the task's state to running:
try { helperBeginRun(s_log); } catch (Exception e) { return; }
The helperBeginRun method does exactly this by resetting the task (i.e. deleting the values of all output slots, if any), setting the state to RUNNING and start a so-called progressor thread that maintains this nice gradient rotation animation.
As helperBeginRun marks the entry of the run method, make sure that every possible exit of the method calls helperFinishRun or helperError as their last statement. The first sets the state to OUTPUTS_READY, the second to ERROR and creating an appropriate error event.
Now let's access the input connection slot. We claim the input value via getValueForced which may cause the task whose output slot connects to our input slot to run if the output is not present yet. We end the tutorial by just displaying the size of the input vector since the remaining code wouldn't add to the principal understanding. The final run method looks as follows:
	public void run()
	{
        try { helperBeginRun(s_log); } catch (Exception e) { return; }


        Vector<NetworkInfo> vecNets = (Vector<NetworkInfo>)m_slotInNets.getValueForced(s_log);
        if (vecNets == null)
        {
        	helperError("input slot is null", s_log);
        	return;
        }

        s_log.info("there are " + vecNets.size() + " nets in the vector.");

        helperFinishRun(s_log);
	}

